In his seminal
The Art of Computer Programming, Donald Knuth dedicated the series to the IBM 650 computer, "in remembrance of many pleasant evenings." If the IBM 650 was the '57 Chevy of 1950s vacuum-tube, drum-memory computers, then you could probably argue that the Bendix G-15 was its Nash Rambler, so perhaps the ElectroData/Burroughs Datatron 205 was its Studebaker.
The only problem with that analogy is that the 205's descendants survive to this day, and the Studebaker's haven't.
My name is Paul Kimpel. Tom Sawyer has graciously allowed me to contribute to his 205 blog and talk about the 205 emulator I've been building. I have never even seen a 205 in person (nor a 650, for that matter), but I've spent many a pleasant evening with some of the Burroughs systems that followed the 205, particularly the B5500, the B6x00/7x00/A Series, and the current Unisys ClearPath MCP systems. For much of my career I have programmed in Algol and other languages for those systems.
This post will introduce the retro-205 emulator, describe its current state of development, and discuss how you can set up and use it yourself. That's a lot of stuff, so this is a fairly long post.
For the impatient who don't want to read through all of the following, the source code and resource files for the emulator are maintained as an open-source project at
https://code.google.com/p/retro-205.
Updated 2015-04-11: The project has been moved from Google Code to GitHub.
The new project site is https://github.com/pkimpel/retro-205/.
You can run the emulator from a
hosting site I have set up, or you can download the files from the project's
Subversion Git repository and set them up on your own web server. See the section
Using the Emulator, below, for details on how to do this.
Choosing to Emulate the 205
I became interested in emulating old computer systems several years ago, thinking it might be a nice hobby to pursue in retirement. I'm not retired yet, but three years ago I started working with Nigel Williams on an emulator for the Burroughs B5500, a very innovative computer system from the mid-1960s. Instead of building that emulator using something like Java or Python or C, Nigel convinced me we should write it in Javascript and host it in a web browser. That idea stunned me at first, and it seemed impossible at the time, but we gradually worked out how to do it. Quite miraculously, someone else recovered a complete system software release for the B5500 from 1971, which gave us the ability to use the emulator more or less as if it were a real B5500.
That B5500 emulator is now functionally complete (if not quite finished), and is freely available as both an open-source project and a hosting site from which you can run it directly. If you are interested, check out the project site at
https://code.google.com/p/retro-b5500/ https://github.com/pkimpel/retro-b5500/ [updated 2015-04-11]. There are links on the home page of that site to the emulator's hosting site, instructions for installing and using the emulator, download the Burroughs software release, and a project blog.
The B5500 project was a lot of work, but I enjoyed it enormously. With that emulator now in a stable state, I started looking around for another emulation project on which to spend entirely too much of my free time. One of the big lessons from the B5500 project was that it's not much use (and absolutely no fun) to build an emulator for a computer system unless you have some software for it to run. There were two candidate systems I'd had in the back of my mind for a while, the 205 and its successor, the Burroughs 220. Both of them had early Algol-58 compilers, and scans of listings for both of those compilers survive.
Both systems would be interesting to work on, but I decided to start with the 205, largely because the compiler for the 205 was written by the very same Donald Knuth during the summer of 1960 while he was a graduate student. One version of that story can be found in Richard Waychoff's
memoir of the B5000 project. We can only hope that Knuth's evenings with the 205 as described in that memoir were as pleasant as his with the IBM 650.
Building an emulator to run in a web browser worked out so well for the B5500 that I wanted to use that approach again. The 205 was slower in every respect than the B5500, so from a performance aspect, there should be no problem in doing so. Therefore, I've set out the following goals for this project:
- Emulate the 205 processor, memory, and I/O as faithfully as is practical within the constraints imposed by a web browser environment. In particular, the emulator should run programs exactly as a 205 would have run them.
- Execute 205 programs as closely as possible to the actual speed of a 205. Emulation at speed is something I was fairly successful in accomplishing with the B5500 emulator, and I think it is an important component for faithful emulation of a system, as opposed merely to simulation of one. You will be appalled at how slow the machines from the 1950s really were.
- Provide as faithful a user experience as is practical within the constraints of a web browser environment. The goal is for you to be able to use the emulator the same way you would have used a 205, with allowances for the fact that the emulator isn't a physical system you can touch and feel and bark your shins against, or get your tie caught in the Flexowriter. The user interface should be at least evocative of the physical machine, though, especially with respect to I/O devices.
- Design and build the emulator so that it will run in a modern, standards-compliant web browser. At a minimum, the two currently-leading browsers should be supported, Mozilla Firefox and Google Chrome.
- Reconstruct and make operational Knuth's 1960 Algol-58 compiler, along with his EASY and MEASY assemblers used to generate the object code for the compiler. PDF scans of listings for these are available from the Computer History Museum's archive site.
Current Development Status
I started researching the 205 in detail during this past summer (2014), and began development in October. As I write this in early 2015, I have just released version 0.03.
At this point the emulator is complete except for the instructions and peripheral devices relating to magnetic tape and the Cardatron. The Cardatron was a buffering and reformatting device that allowed the 205 to use IBM punched-card tabulating equipment, particularly the 87 and 89 collators, 407 tabulator (printer), and 523 summary punch. Magnetic tape and Cardatron I/O will be available in a future release.
All other 205 instructions have been implemented, including those for floating-point arithmetic. For I/O, the emulator currently supports input from paper tape devices and the decimal keyboard, and output to paper tape and the Flexowriter electric typewriter. See below for details on how these devices are emulated in a browser environment.
The emulator is written entirely in Javascript, with HTML and CSS used to lay out the user interface. It requires a fairly modern web browser in order to run, as it employs a number of features introduced with the on-going HTML5 standardization effort. The emulator has been tested and works with reasonably-recent versions of both Mozilla Firefox and Google Chrome. It should run under Microsoft Internet Explorer, but I'm presently having a problem with the way that IE handles the emulator's web fonts. I have not yet tested the emulator with Opera or Apple Safari, but it runs quite well on a Macintosh under either Firefox or Chrome.
The 205 used a rotating magnetic drum for its memory. The drum was word-addressable, but as drums go, it rotated quite slowly -- only 3570 RPM. Average access time to the 4000-word main portion of the memory was 8.4 milliseconds. Note that was the average time for a
memory access, not an I/O. To provide faster execution speed, the drum had in addition four 20-word "high-speed loops." These had separate read and write heads, and through a clever feedback mechanism between the heads, provided ten times faster access to those 80 words. The processor had special "blocking" instructions that would transfer 20 words at a time between the main and high-speed portions of the memory. Variants of those instructions would also branch to the loop address following the transfer.
The emulator models the drum using Javascript arrays, which on a modern workstation are many thousands of times faster than the physical drum was. Since much of the instruction timing of the 205 was determined by drum latency, the emulator attempts to delay execution during each memory access to throttle the speed of the emulation down to that of a real 205. Running from the high-speed loops, you typically will get get about 200 instructions/second. Running from main memory, you will get about a tenth of that. It's a long way from a MIP.
The contents of the main portion of the drum memory were retained when the 205 was powered off. The emulator does not presently preserve the contents of memory across browser sessions, but I am considering implementing this behavior in a future release.
I am deeply indebted to Tom Sawyer for his advice and assistance in getting the emulator to its current state. Tom has generously shared both his experience actually using a 205, and a number of hard-to-find references that have been invaluable in designing the emulator and getting it to work. We have engaged in a lively and entirely enjoyable correspondence over the past six months, which I look forward to continuing.
The next priorities for development are support for the Cardatron, punched-card equipment, and magnetic tape. At a minimum, the Cardatron is required for Knuth's compiler. Once the I/O development is finished, the next steps will be transcribing the source for the assemblers and the compiler and getting them to run.
Using the Emulator
As mentioned above, the emulator requires a reasonably-recent modern browser, with Firefox and Chrome being the two I have used successfully with the emulator to date. You will also need a reasonably powerful workstation. Emulation of the 205 instructions requires almost nothing, but update of the panels and I/O device windows can be very graphics-intensive, and requires a fair amount of horsepower. My two-year old Dell PC with a 3GHz quad-core Pentium i3 processor handles the emulator with ease, while my five-year old HP netbook with a 1GHz Atom processor struggles to keep up, probably because it doesn't have much in the way of a GPU to handle the display updates. It will also help if you have a big monitor, as the windows for the control panels and I/O devices tend to overlap each other.
The emulator must be served to your browser from a web server over HTTP. You will not be able to download the emulator files to your workstation and run them directly from your local file system. That is a limitation with the way that browsers work, not a problem with the emulator. Of course, there's no reason you can't run a web server on your workstation and serve the emulator files from there. Regardless, once the emulator is loaded into your workstation, it runs entirely locally, and needs no further access to the web server.
Using the Browser Application Cache
[Updated 2021-01-25: Most current browsers have now deprecated the Application Cache feature. Support for this feature was removed from the retro-205 emulator in version 1.02, February 2020]
Starting with release 0.03, it is now possible to run the emulator without access to a web server at all. The emulator is configured to load into the browser's "Application Cache." This an HTML5 feature, and is not so much a cache as a way to install all of the HTML, Javascript, images, and other resources for a web-based application into the browser and store them in your workstation's local file system. You must load the emulator initially from a web server, but that initial load will automatically install the emulator into the App Cache. Thereafter, you run the emulator in your browser using the same URL you used initially, but the browser will load the emulator from its App Cache instead of the network. You don't need an active network connection at all.
Each time you load the emulator into your browser, the browser will test whether it is able to contact the web server from which the emulator was originally loaded, and if so, will check whether a newer version of the application is available. If a newer one is available, the browser will download and and install it into the App Cache, but the browser will continue to use the former version of the application until the next time you reload it, at which point the newer version will be the one used.
All installation and maintenance of the emulator in the App Cache is completely automatic and happens in the background. The emulator files comprise about 4MB (most of that is font files), so the initial download may take a short while, depending on the speed of your network connection. After that, the emulator should load very quickly.
Note that installation of a web application in the App Cache is specific both to the browser and to the web server host name from which the application was loaded. If you use different browsers, each will have its copy of the application. If you load from different web servers, or using different host names for the same web server, each will result in a separate copy of the application in the App Cache.
Running the Emulator
You are welcome to run the emulator from my hosting site. The URL for that site is:
If you would prefer to run the emulator from another web server, download the files from the
Subversion Git repository on the project site cited in the introduction. You can download a zip file of the latest version of the emulator source code by clicking the
Download ZIP button on the project's home page:
Alternatively, you can clone the project from the repository using the following Git command:
git clone https://github.com/pkimpel/retro-205 retro-205
Although the GitHub project site uses a Git source code repository, GitHub also allows you to access the repository using Subversion clients. A read-only checkout of the emulator files can be performed using a Subversion command similar to this:
svn checkout http://retro-205.googlecode.com/svn/trunk/ retro-205
svn checkout https://github.com/pkimpel/retro-205/trunk retro-205
[Updated clone/checkout information above as of 2015-04-11]
You will need the
emulator/,
webUI/, and
webUI/resources/ directories from the repository; the
webUI/prototypes/ directory is not used by the running emulator. The
emulator/ and
webUI/ directories must be rooted in the same virtual directory on your web server.
The emulator will open a number of sub-windows when it
initializes. Most browsers will consider these windows to be "pop-ups,"
so if you are using a pop-up blocker, you should disable it before
starting the emulator. Most browsers implement a pop-up blocker, and
many browser toolbar plug-ins implement additional ones. All of them
will need to be disabled. Most pop-up blockers will allow you to disable
blocking for specific web sites, however, which will allow you to run the emulator
conveniently without having to forgo protection from pop-ups for all
sites.
The Emulator Home Page
The emulator requires no other setup or configuration. Once it loads into your browser, it's ready to run. The hosting-site URL above references the emulator's home page, which looks like this:
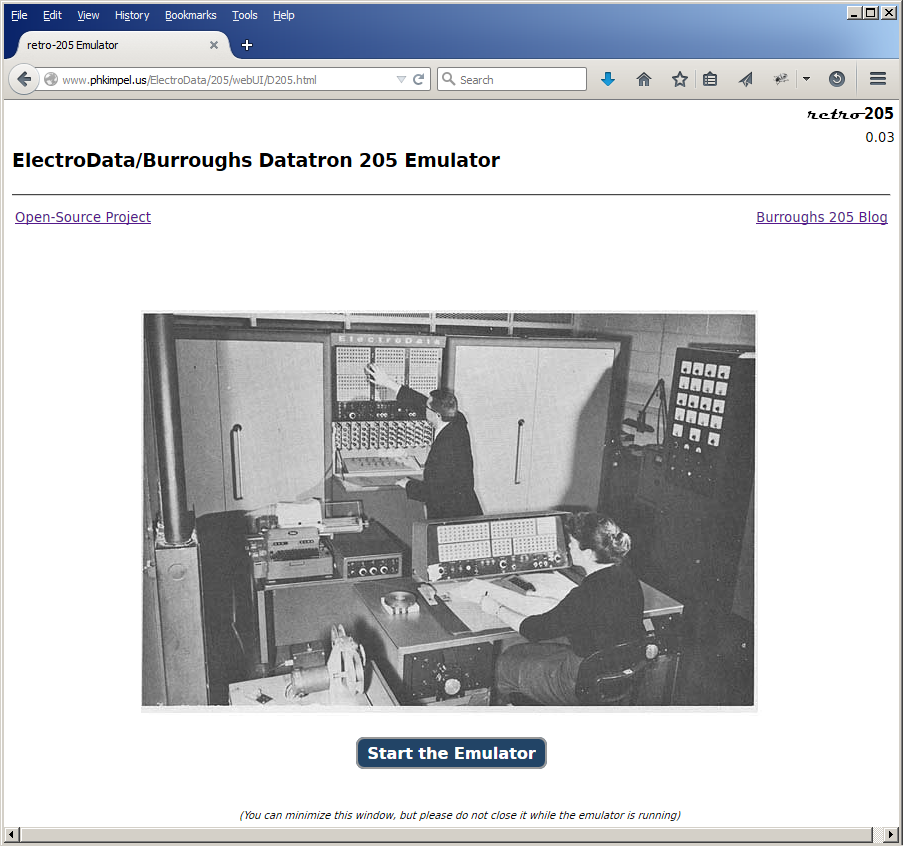
The current version of the emulator is shown in the upper-right corner of the page. There are links below the horizontal bar to the open-source project site and to this blog. Status messages may appear briefly between those two links, indicating the status of the application in the App Cache. The picture shows a typical 205 installation without card or magnetic tape equipment. This one is from the Detroit Arsenal, ca. 1961. In the background behind the standing man is the mainframe cabinet with its Supervisory (Engineer's) Panel. In the foreground behind the sitting woman is the Control Console with the optical paper-tape reader built into the console desk to her lower left. Behind the Control Console is the Flexowriter and its Typewriter Control Unit (TCU). The bank of dials to the far right is the Power Control cabinet for the system.
To start the emulator, click the large blue Start button below the picture. Additional windows will open for the two control panels and the I/O devices. The blue button will become disabled after it is clicked, and will remain so until the emulator is powered down from the Supervisory Panel as discussed below. While the emulator is running, the home page is not needed. You may minimize the home page on your screen, but it would be best not to close it.
Also note that some browsers, particularly Firefox, will slow execution of scripts for a web page if that page is in a tab other than the currently-active one of a window. In the case of the emulator, this means that if the home page is in a non-active tab, the emulator will likely run very slowly. If you need to use the browser for another purpose while the emulator is running, leave the emulator's home page in the active tab of its window and open another window for the other purpose.
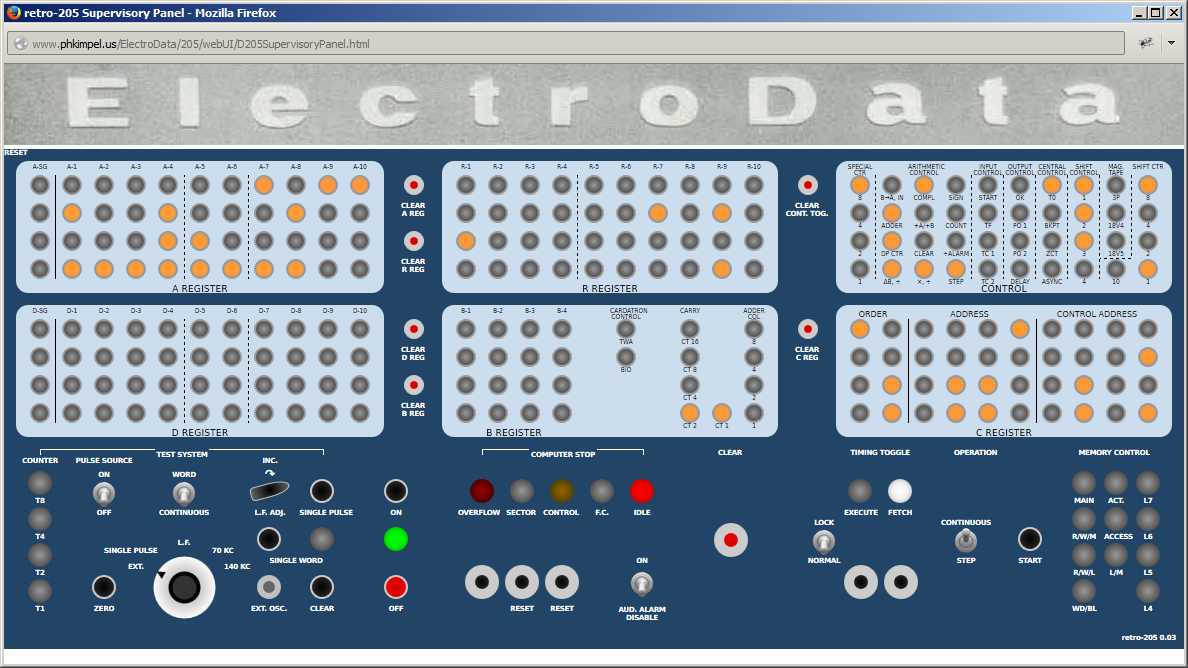
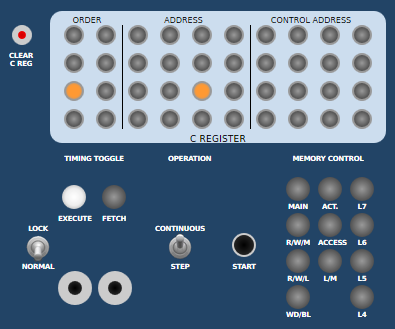
Supervisory Panel
The Supervisory Panel is the one you will probably use the most:
 |
| 205 Supervisory Panel |
The upper portion of this panel shows the registers and major control toggles (flip-flops) for the system. The lower portion has switches and buttons to control the system, along with some additional lamps showing the system's status.
The entire portion of the panel labeled "Test System" is inactive. You can play with the buttons and switches, but they don't do anything. These controls manipulated the low-level electronics of the system for testing and maintenance, but the emulator does not operate at that low a level. The "Audible Alarm" switch is also non-functional at present.
One set of controls that functions somewhat
differently from a real 205 are the power ON and OFF buttons above and
below the green lamp to the right of the controls for the Test System.
The ON button is presently non-functional and is effectively replaced by the Start button on the home page.
Clicking Double-clicking the OFF button
[changed in version 1.01, March 2018] will shut down the emulator, close all of the panel and I/O device windows, and re-enable the Start button on the home page. Make sure you have saved any output from the Flexowriter and paper-tape punch that you want to keep before powering down the emulator.
The remainder of the switches, buttons and lights work as they would have on a real 205. There is a good description of this panel and its use in the
Burroughs 205 Handbook of Operating Procedures at bitsavers.org.
The panel on a real 205 had arrays of small push-buttons mirroring the neon lamps. These buttons were used to set or reset individual bits in the registers. To save space on the display, the emulator eliminates these arrays of buttons. Instead, you set bits in the registers by clicking the lamps themselves. Each click on a lamp toggles the state of the corresponding bit in the system.
The displays for the A, B, C, D, and R registers on this panel accurately reflect the contents of their registers. Most of the toggles in the CONTROL register display, however, are not actually used by the emulator in its internal execution of instructions, as most of those toggles affect machine state at a level below which the emulator operates. The emulator makes an attempt to set those toggles somewhat realistically for the purpose of creating an interesting display, but the lamp activity in that register is mostly just for show.
The emulator does not presently implement the Sub-Maintenance Panel, which was located on a shelf below the Supervisory Panel.
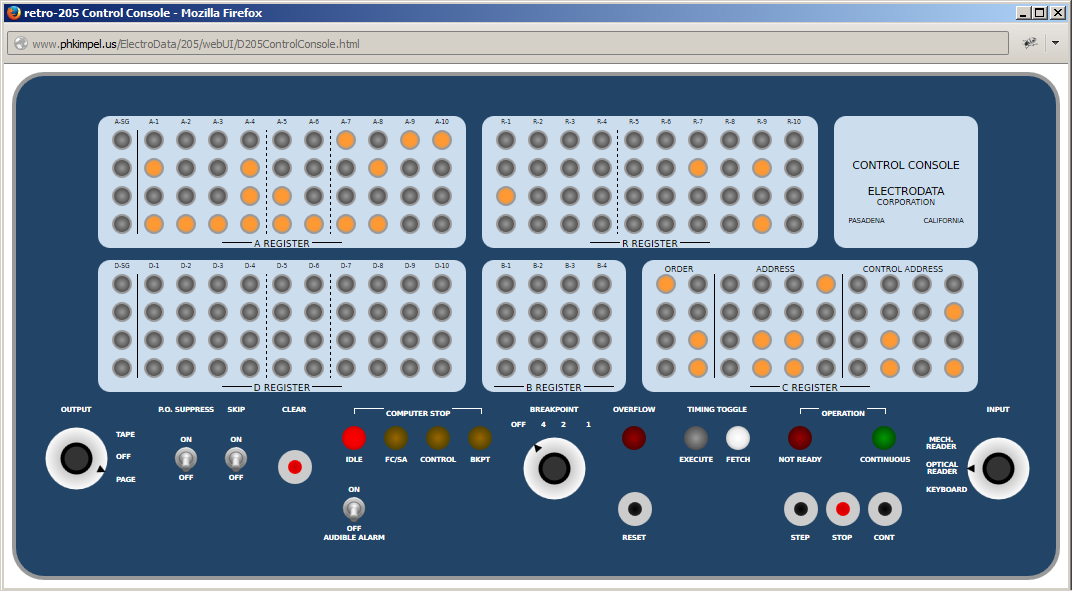
Control Console
The Control Console is infamous for its use as a stage prop in TV shows such as
Lost in Space and
Batman, and in movies such as
Angry Red Planet and
Fantastic Voyage. It has something of a cult following due to that stage exposure, but for most 205 operational purposes it's actually the less useful of the two control panels:
 |
| 205 Control Console |
This panel echos the major registers and status lamps on the Supervisory Panel. It also has switches and knobs to control breakpoint stops and selection of the paper-tape and Flexowriter I/O devices. This panel is also nicely described in the
Operation Procedures manual cited above.
Unlike the Supervisory Panel, and in keeping with the way the 205 worked, the neon lamps for the registers on the Control Console do not respond to clicks. The ability to set registers from this console is limited, and can only be done through the numeric keypad when the INPUT knob is in the KEYBOARD position.
The circular knobs on this panel respond to clicks. Each click advances the knob to its next position. When the knob reaches its last position,
the next click moves it to the knob's first position subsequent clicks move the knob in the reverse direction
[updated July 2015].
Both panels update approximately every 50ms to show the state of the corresponding toggles in the processor. Note, however, that while both panels display system status in parallel, only one panel at a time could be used to control execution of a program on the 205. The emulator attempts to reproduce this behavior:
- In order to operate the system from the Control Console, the NORMAL/LOCK and STEP/CONTINUOUS switches on the Supervisory Panel must both be in the down position (NORMAL and STEP). When either of these switches is in the up position, the NOT READY lamp on the Control Console will light and the STEP, STOP, and CONT buttons on that panel will be inactive.
- When running from the Control Console, you must click the STOP button on that panel in order to control the system from the Supervisory Panel. The START button and STEP/CONTINUOUS switch on the Supervisory Panel will not be effective when the system is running continuously from the Control Console.
- As with the Supervisory Panel, the Audible Alarm switch on the Control Console is presently non-functional.
- Regardless which panel is currently controlling the execution of a program, the three circular knobs for input, output, and breakpoint selection, the P.O. SUPPRESS and SKIP switches, and the CLEAR and RESET buttons on the Control Console are always active.
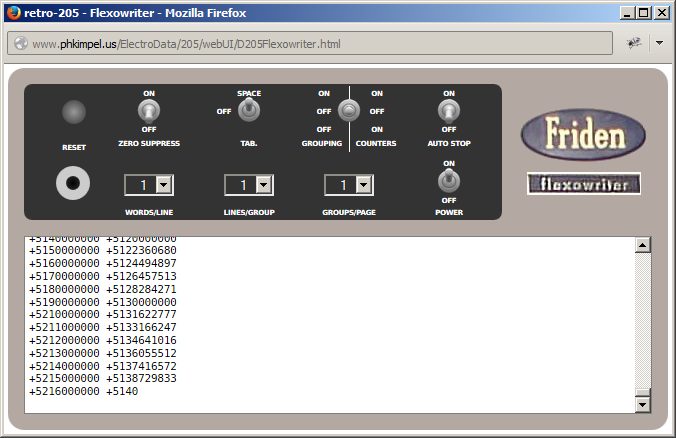
Flexowriter and Typewriter Control Unit
The Flexowriter was a heavy-duty electric typewriter used by many early computer systems. It also had a paper-tape reader and punch. The emulator models the typewriter and reader, but not the punch (although see the discussion of the high-speed punch below). There were actually two models of Flexowriter, one used with Datatron 204 and earlier systems that did not have a Cardatron, and one for the 205 that was modified to use the same character codes as the Cardatron. The emulator models the Cardatron version.
 |
| 205 Flexowriter and TCU |
Associated with the Flexowriter was a box of relay logic known as the Typewriter Control Unit (TCU) that could perform limited formatting, outside of program control, for data printed by the 205. Basically, it could insert tabs or spaces between words as they were printed, insert a carriage return after a specified number of words on a line, double-space between groups of a specified number of lines, and optionally halt the computer after a specified number of groups were printed (e.g,. to change the paper in the printer). The emulator fully supports this device. It cannot be powered off, but it can be effectively disabled (and thus permit all formatting to be under program control) by setting the GROUPING | COUNTERS switch to the OFF-OFF (middle) position. See the
Operating Procedures manual for details.
The Flexowriter window can be resized like any other window, and the "paper" area will resize with it. Lines that scroll off the visible portion of the paper area are retained in memory, and can be viewed by scrolling the paper area. The maximum capacity of the paper area is 15,000 lines (about 250 pages -- 25 hours of printing). Printing beyond this limit will cause the oldest lines to be discarded.
You can save or print the contents of the paper area by double-clicking anywhere in the text of that area. A new, temporary window will open, the entire contents of the paper area will be copied to that new window, and the paper area for the Flexowriter will be cleared. From the new window, you can print or save the text using the normal facilities your browser provides for that purpose. When you are finished with it, simply close the new window.
Paper Tape Reader
The emulator models both the high-speed optical paper-tape reader and the reader on the Flexowriter as one device using this window. Both the OPTICAL READER and MECHANICAL READER settings of the INPUT knob on the Control Console will read from data supplied to this window. The only difference between the two selections is the speed at which data is read. The optical reader works at 540 characters/second; the reader on the Flexowriter works at 10 characters/second.
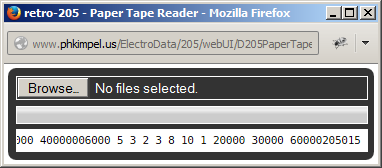 |
| 205 Paper Tape Reader |
Paper tape I/O on the 205 was very primitive -- it read raw words from the tape as strings of decimal digits. The tape had seven channels: four for the binary-coded decimal (BCD) value of the digit, one for a "clock" punch that identified rows where a valid digit occurred, one for a "finish" punch that identified the end of a word, and one for a "delete" punch that would invalidate the digit in that position and cause it to be skipped. This was considerably pre-ASCII -- there was no facility for reading alphanumeric data.
You prepare a "paper tape" for the emulator as an ordinary text file. Each line in the file represents one word to be read by the system. The newline sequence between lines of text in the file is interpreted as a finish punch. If the last line in a file is not terminated with a newline, the end of the file acts as a finish punch. A newline may be:
- a carriage-return followed by line-feed (ASCII hex 0D0A, the Windows convention)
- a line-feed (ASCII hex 0A, the Unix/Linux convention)
- a carriage-return (ASCII hex 0D, the pre-OS X Macintosh convention).
Only the decimal digits 0-9 are significant within a line; all other characters are simply ignored. A 205 word consisted of 11 digits (sign plus 10 for data). These are read left-to-right, with the sign in the leftmost position. If fewer than 11 digits appear on a line, the digits will be stored in the word right-justified over zeros. If more than 11 digits appear on a line, only the rightmost 11 will be used.
To load a "tape" into the reader, click the "Browse..." or "Choose File..." button on the window's file picker control and select the desired file from your local file system. You can also select multiple files at one time. The content of all of those files will be concatenated in the reader, although the order in which they will appear depends on the browser and operating system. You can also use the file picker multiple times to load a sequence of files in the reader. Once the files are loaded, the data acts as if the files had been spliced, and looks to the system like one long tape.
Below the file picker control is a progress bar that shows the relative amount of data left to be read from the virtual input tape. To remove unread data from the reader, click this bar. An alert will pop up asking if you want to empty the reader. Click OK or Cancel as appropriate.
Below the progress bar is a text area that will scroll, showing the data as it is being read. Only the decimal digits from the file appear here; any non-decimal characters will not be shown. Each finish punch is shown as a space.
Paper-tape input is called for by executing a PTR (
00) or DAD (
10) instruction with the INPUT knob on the Control Console set to OPTICAL or MECHANICAL READER. If a "tape" has been loaded into the reader, the system will begin reading it. If no tape is loaded, however, the system will pause and the reader window will pop up. Simply loading a file into the reader will cause the system to resume.
Whenever the system calls for data from either reader, an orange "PAPER TAPE READER" annunciator will appear in the lower-right of the Control Console. This is an artifact of the emulator and did not exist on a real 205, where you could hear the reader's motor start up. The annunciator is a visual analog to that audible clue.
High-Speed Paper-Tape Punch
The 205 had a paper tape punch that could output data at 60 characters per second. This was "high speed" relative only to the punch on the Flexowriter, which worked at 10 cps. The OUTPUT knob on the Control Console determined whether output went to this punch or the Flexowriter. Output to the punch on the Flexowriter was controlled locally on the Flexowriter as an alternative to printing on paper, which is why the emulator does not model the Flexowriter punch.
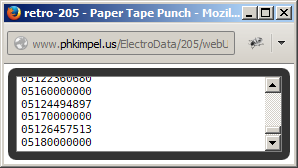 |
| 205 Paper-Tape High-Speed Punch |
The emulator's high-speed punch works very similar to the "paper" area of the Flexowriter, except that data is output one word per line and the sign digit is output as a decimal digit rather than "+" or "-". Output from the punch can be used as input to the paper-tape reader.
To save or print the contents of the punch "tape" area, do the same as for the Flexowriter -- click anywhere in the text of that area and a new, temporary window will pop up. The text in the tape area will be moved to that new window, from which you can save or print the data. The punch has a capacity of 15,000 lines (words). When output exceeds this limit, the oldest lines will be discarded.
Decimal Keyboard
The Control Console had a small numeric keypad that sat on the console desk and was attached by a cable to the console's electronics. Since the Control Console did not have the ability to set individual toggles as the Supervisory Panel did, this keyboard was used to enter instructions and data into the system when running from the Control Console.
The keyboard's abilities were somewhat limited, however. Digits entered on the keyboard shifted into the low end of the D register. An "F" (finish) key on the keyboard signaled the end of a word. This was sufficient to enter words into memory and key in single instructions for execution, but it was a lot less flexible than the full control available on the Supervisory Panel.
Input from the keyboard was accomplished the same way as from paper tape -- by execution of a PTR (
00) or DAD (
10) instruction, but in this case with the INPUT knob on the Control Console in the KEYBOARD position.
Whenever the system calls for data from the keyboard, an orange "KEYBOARD" annunciator will appear in the lower-right of the Control Console. This is an artifact of the emulator and did not exist on a real 205. The annunciator simply indicates that the keyboard is active and ready for input.
The emulator will accept keystrokes from your workstation's keyboard when the 205 decimal keyboard is enabled. Digits may be entered either on the numeric keypad or the numeric row of the main keyboard. An Enter or "F" key on your workstation's keyboard will act as the "F" key on the decimal keyboard. All other keystrokes are ignored.
Note that in order for the emulator to sense your keystrokes, the Control Console window must have the focus. This window is automatically given the focus whenever input is called for from the keyboard.
So What Can You Do With a 205?
The preceding introduction should give you enough information to load the 205 emulator into your browser and operate its controls. Then what?
The short answer is, of course, you run programs and watch the pretty lights. We don't have a lot of software available yet, but Tom has been working up a few small programs, and in future posts we both hope to publish additional ones. Contributions from readers will be most welcome.
Some basic documentation for the 205, describing the instructions and operating procedures, is available at
bitsavers.org. In addition to the
Operation Procedures manual cited above, there is an early
Preliminary Programming Guide from 1954, and the
Burroughs 205 Central Computer Handbook.
Just to give the emulator something to do out of the box (read: make the lights blink), I've pre-loaded a few small programs I've used for testing. The starting addresses for each of these programs are:
- 0000 -- a counter program that runs from main memory and increments the A register.
- 0010 -- a program that runs from the 6000 and 7000 loops and computes square roots, printing the argument and root values to the Flexowriter or paper-tape punch.
- 0020 -- the classic Hello World program.
- 0100 -- the same square root program as at 0010, but which runs from main memory instead of the high-speed loops.
- 0300 -- the same square root program modified to use floating point arithmetic. Floating point numbers are represented as seemmmmmmmm, where "s" is the sign digit, "ee" is the exponent biased by 50, and "mmmmmmmm" is the mantissa with the decimal point to the left of the first digit. The number 2.23602 (or 0.223602E+01) is represented in the 205 as +5122360200.
To run one of these programs, press the CLEAR button on the Supervisory Console and make sure the NORMAL/LOCK switch is set to NORMAL and the STEP/CONTINUOUS switch is set to CONTINUOUS. Enter a Change Unconditional (branch) op code (
20) in the ORDER field of the C register, and the starting address in the ADDRESS field of the C register. All digits are BCD, with the low-order bit of the digits in the bottom row of the register lamps. The value of the CONTROL field of the C register is immaterial. Make sure the EXECUTE lamp is lit. Press the START button to begin execution.
All of these programs, except Hello World, run continuously until they are halted by either flipping the STEP/CONTINUOUS switch to STEP, pressing CLEAR, or powering off the emulator. Hello World prints its message once and then halts with the CONTROL and IDLE lamps lit.
The following shows the panel as it should be set to run the Hello World program at 0020:
 |
| Setup to Branch to a Program at Address 0020 |
May you have many pleasant evenings with this emulator.


